Saving and loading data in a XNA windows game (XmlSerialization)

July 23rd, 2012

…with drag-and-drop code as a freebie Winking smile

xmlserialization

Here is a short introduction to saving and loading your gamedata in XNA using the built-in .net xml serialization. This only works for Windows games, not XBOX nor Windows Phone 7. But if you (like me) mostly code windows games, it’s very easy to use Smile.

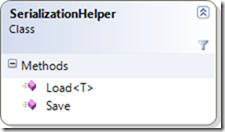
I’ve made a small helperclass “SerializationHelper” to assist with saving and loading data:

SerializationHelper

You use it by calling this code for saving objects:

SerializationHelper.Save(objectToSave); 

and this code for loading them again:

MyObjectType theObject = SerializationHelper.Load<MyObjecttype>();

Sample of loading in a game:

SpaceShip _ship = SerializationHelper.Load<Spaceship>();

See it in action

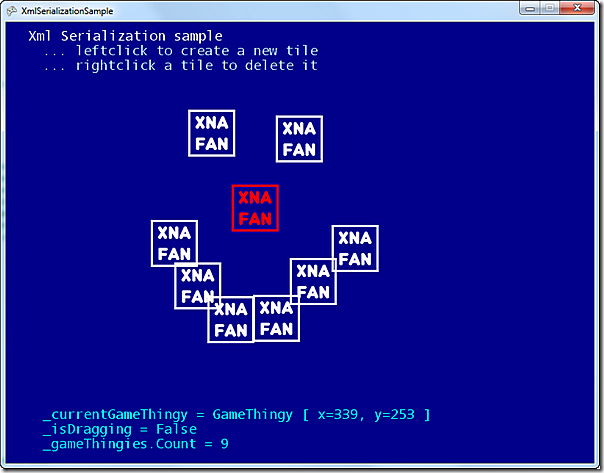
Here you can see how I move objects in an XNA game and then exit the game. When I restart the game, the objects are where I left them when I last shut down.

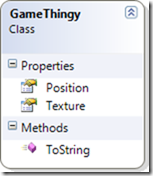
I made a small class called GameThingy to show how to serialize/deserialize.

GameThingy

Classes for Xml serialization must have a default (parameterless) constructor. This means that you cannot use subclasses of GameComponent (including DrawableGameComponent) without a bit of code-trickery. So this is mainly usable for your own, homerolled classes.

Also be aware that some objects (Texture2D for example) are not serialized out, so you need to add this data yourself after you’ve deserialized the objects from xml:

//load the texture to use for the GameThingies
Texture2D _xnafanTexture = Content.Load<Texture2D>("xnafan");
//load the list of GameThingy
List<gamethingy> _gameThingies = SerializationHelper.Load<List<GameThingy>>();
//if there wasn't a list of _gameThingies (file didn't exist)
if (_gameThingies == null)
{
    //create a new, empty list
    _gameThingies = new List<GameThingy>();
}
//set the Texture on all gamethingies
_gameThingies.ForEach(t => t.Texture = _xnafanTexture);

Here's a more thorough walkthrough of the code:


 Here’s the complete code.

Simple drag and drop with snap-to-tiles in XNA

July 14th, 2012

If you need to create a tile-based editor, or for some other reason need to show selected tiles based on the mouseposition – here’s some code to help you do that Smile.

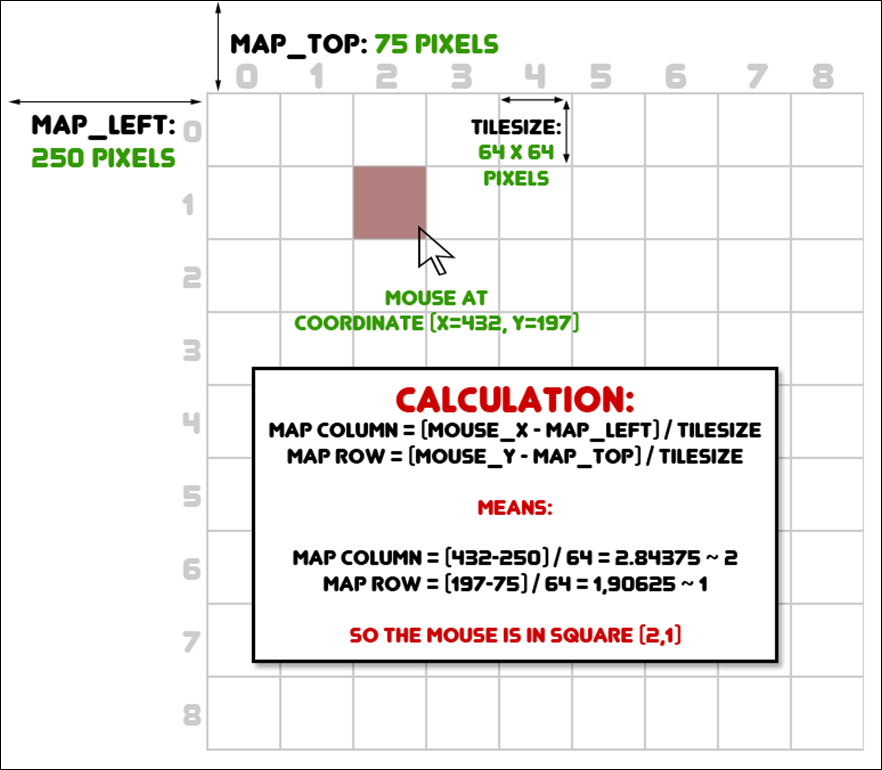
The most basic part of the code is figuring out what tile you are over by doing an integer division using the tile size. Let’s say your mouse is at (x=432,y=197) and each tile is 64x64 pixels. Which square is the mouse over?

well 432 / 64 = 6.75, but if this is done using two integers (int in C#), the decimal part is removed and we’re left with 6. The same with the y-part 197 / 64 = 3.078125 which is  3 without the decimal part.

Often however, you don’t want the map to start in the upper lefthand corner of the screen, so we need to subtract the position of the map from the coordinates.

This gives us something like this:

calculation

… where you subtract the top and left from the mouse’s coordinates before doing the integer division to find the square’s coordinates.

Here's the code above as a method which given the coordinates of the mouse, returns the row and column in the map:

//get the column/row on the board for a given coordinate
Vector2 GetSquareFromPosition(Vector2 position)
{
    //adjust for the boards offset (_boardPosition) and do an integerdivision
    return new Vector2(
    (int)(_mousePosition.X - _boardPosition.X) / _tileSize,
    (int)(_mousePosition.Y - _boardPosition.Y) / _tileSize);
}

Another noteworthy codesample

Making a “chessboard” out of the same Texture2D by alternating based on whether the column + row of a square is even or odd (by using the modulus “%” operator).

The modulus operator gives what is left after an integer division, so if you take an even number modulo 2 the remainder is zero, the remainder of an odd number modulo 2 is one.

float opacity = 1f;

//if we add the x and y value of the tile
//and it is even, we make it one third opaque
if ((x + y) % 2 == 0)
{
    opacity = .33f;
}
else
{
    //otherwise it is one tenth opaque
    opacity = .1f;
}

//draw the white square at the given position,
//offset by the x- and y-offset, in the opacity desired
spriteBatch.Draw(_whiteSquare, squareToDrawPosition, Color.White * opacity);

You can find the code here

Free XBox buttons and controller graphics for your game…

June 13th, 2012

We’re still working on StarSuckers (working title Winking smile). And have had to create a lot of graphics from scratch to avoid copyright infringements. So I thought I would share these buttons and controllers I made, in case any of you could use them. Here are the buttons in 256x256, 128x128, 64x64 and 32x32 pixels. (download)

contactsheet

And the controllers in 256x256 pixels (download)

contactsheet_controllers

Enjoy Smile

Progress on StarSuckers

May 13th, 2012


starsuckerstitle_new_small600

As you can see above: the splash screen for Starsuckers has been updated using Flavio Takemoto’s “Shine Energy 5” image from SXC – thanks Flavio! Smile

We’re currently in the process of going through the Microsoft “Evil List”, and making sure our game lives up to the checklist before we send it for approval. If any of you are going to create a game for XBOX, there’s also a best practices list you should adhere to, and these two may be of interest as well:

http://forums.create.msdn.com/forums/t/17830.aspx
http://create.msdn.com/en-US/resources/help/peer_review_language_faq

GameThumbnail The Game Thumbnail is currently this logo here (left) – we may change it so the splashscreen and game thumbnail are more in sync graphically – but we’re not graphics artists, so we’ll see about that Winking smile

We’re defining what will be left out of the trial version. We’re considering, the single player mode (with AI), the multishots and the ability to aim yourself instead of the Starsucker firing for you, to be extra for the full version.

More updates as we progress!

StarSuckers – our IndieJam 2012 entry

April 26th, 2012


In the beginning of April we participated in the cozy IndieJam in Aalborg, Denmark.
The theme was “Out of this world”, and our little two-man-team got a split-screen two-person-spaceshooter up and running before the time of judgement, sunday morning Smile.

StarSuckers_screen-1024x574

We were ONE measly vote from winning the indie Smile. So we have decided to publish the game on the XBOX 360 Indie channel. We’re devoting one day a week to the project, so before the summer is over, you will probably be able to play it.

If you’ve got XBOX 360 controllers with a USB adapter – you can download the playable version (XNA 4.0) and beat a friend (or enemy) of yours at home Winking smile … or maybe get the code.

Created by yours truly and Jesper Niedermann.

Manipulating doublearrays – an extension method

March 22nd, 2012
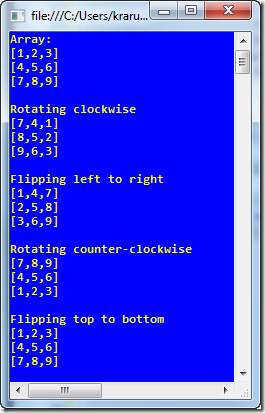
arraymanipulations

I’ve been fiddling around with returning JSON from an Asp.net MVC solution and getting it in Jquery using the $.getJSON method. Unfortunately – when the default JSON serializer in .net serializes my doublearrays it takes the values of the first column first, then the next column, etc. I would like it to serialize it as one row, then the next, etc.

I am aware that this is default behavior and that I could just populate the doublearray with rows as columns and vice versa, but I find it more intuitive to be able to refer to the first indexer in an array as x and the second as y, like this:

byte[,] data = new byte[3,3];
int x = 2;
int y = 1;
data[x,y] = 1;

Therefore I created a little extension method for manipulating doublearrays. You may find it helpful if you need to rotate an array, or swap values vertically or horizontally.

You can perform multiple operations by chaining the manipulations.

This is how you use it:

byte[,] data = new byte[3,3];
byte[,] manipulatedData =data.GetManipulatedCopy(ArrayManipulation.RotateClockwise);

Download Vs2010 project

Download Class file

Here is the complete class:

using System;

// Class with extensionmethods to manipulate doublearrays with
// Jakob Krarup (www.xnafan.net)
// Use, alter and redistribute this code freely,
// but please leave this comment

namespace ArrayManipulation
{

    /// <summary>
    /// Defines how to manipulate an array
    /// </summary>
    public enum ArrayManipulation
    {
        /// <summary>
        /// Moves all values around the array clockwise
        /// </summary>
        RotateClockwise,

        /// <summary>
        /// Moves all values around the array counterclockwise
        /// </summary>
        RotateCounterClockwise,

        /// <summary>
        /// Swaps all values from the top to bottom and vice-versa
        /// </summary>
        FlipTopToBottom,

        /// <summary>
        /// Swaps all values from left to right and vice-versa
        /// </summary>
        FlipRightToLeft
    }

    public static class ArrayExtensions
    {

        /// <summary>
        /// Implements easy doublearray manipulations
        /// </summary>
        /// <typeparam name="T">The type of the values in the array</typeparam>
        /// <param name="matrix">The doublearray</param>
        /// <param name="manipulation">How to manipulate the array</param>
        /// <returns>A copy of the array with the values as ordered</returns>
        public static T[,] GetManipulatedCopy<T>(this T[,] matrix, ArrayManipulation manipulation)
        {
            int width = matrix.GetLength(0);
            int height = matrix.GetLength(1);
            T[,] ret = null;
            switch (manipulation)
            {
                //if we are rotating the matrix,
                //we need to swap width and height sizes
                case ArrayManipulation.RotateClockwise:
                case ArrayManipulation.RotateCounterClockwise:
                    ret = new T[height, width];
                    break;

                //otherwise we create an array with the same size
                case ArrayManipulation.FlipTopToBottom:
                case ArrayManipulation.FlipRightToLeft:
                    ret = new T[width, height];
                    break;
                default:
                    throw new ArgumentOutOfRangeException("Invalid manipulation : " + manipulation);
            }

            //for all values in the source matrix...
            for (int y = 0; y < height; ++y)
            {
                for (int x = 0; x < width; ++x)
                {
                    //copy the values to the new array
                    //choosing position depending on the wanted manipulation
                    switch (manipulation)
                    {
                        case ArrayManipulation.RotateCounterClockwise:
                            ret[y, width - x - 1] = matrix[x, y];
                            break;
                        case ArrayManipulation.RotateClockwise:
                            ret[height - y - 1, x] = matrix[x, y];
                            break;
                        case ArrayManipulation.FlipTopToBottom:
                            ret[x, height - 1 - y] = matrix[x, y];
                            break;
                        case ArrayManipulation.FlipRightToLeft:
                            ret[width - 1 - x, y] = matrix[x, y];
                            break;
                    }
                }
            }

            //return the new array
            return ret;
        }
    }
}

Searchwords for Google: extensionmethod, rotate double arrays, manipulate two-dimensional, twodimensional arrays, non-jagged

Maze creation in C#

March 17th, 2012

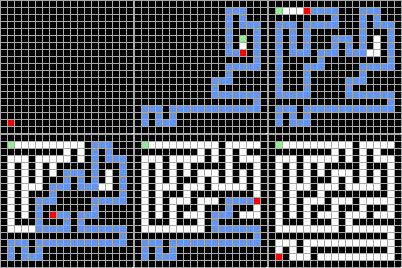
maze_19x19

A small maze generator for use in .net.

I am currently in the process of learning how to code 3D graphics in XNA 4.0.  It’s a lot of fun – and I’ve gotten pretty far with just boxes covered by different textures. However I thought that it would be fun to have a small mazegame – where you’re running around as a bewildered labrat inside the maze. For that I would need to have a random maze generated each time.
So I Googled around, found some tips, and coded a mazegenerator.

After that I took the time to comment the code  and wrap it up. So if you don’t care about the inner workings, you can just add a reference to my DLL and get mazes like this:

//get a MazeCreator ready to make 9x9 mazes that start at 1,1
MazeCreator creator = new MazeCreator(9, 9, new Point(1, 1));
byte[,] maze1 = creator.CreateMaze();
byte[,] maze2 = creator.CreateMaze();
byte[,] maze3 = creator.CreateMaze();

Update - thanks to the anonymous commenter below, you can now get the point in the maze furthest from the starting point:)

If you want to know where the position in the maze that is furthest from the starting point is, you can ask the MazeCreator object after you have created the maze:

//get a MazeCreator ready to make 9x9 mazes that start at 1,1
MazeCreator creator = new MazeCreator(9, 9, new Point(1, 1));
byte[,] maze1 = creator.CreateMaze();
Point furthestPosition = creator.FurthestPoint;

Basics of maze creation

The basic algorithm of creating a maze is as follows (pseudocode)

Start at a valid starting point in the maze - then:
as long as there are still tiles to try
{
  excavate the square we are on
  get all valid neighbors for the curent tile
  if there are any interesting looking neighbors to branch off to(*)
  {
    remember the current tile, by putting it in a list of potential branch-offs (stack)
    move on to a random of the neighboring tiles
  }
  else
  {
    we are at a dead-end
    toss this tile out, thereby returning to the previous tile in the stack
  }
}


(*) and they are valid for whatever rules you have for your maze

(Longer writeup here: http://en.wikipedia.org/wiki/Maze_generation_algorithm)

Take a look at the animated gifs on this page, and try to follow along with the steps. I have chosen to use complete tiles for walls, but you could as well have neighboring tiles with a thin wall between in your own implementation.

The MazeCreator also has a MazeChanged event that signals every time a new tile has been excavated. This makes it easy to monitor the progress, either by inspecting the Maze property (byte[,]) or by calling the maze’s ToString representation:

image

LEGEND

X = wall

.  = tile which still needs to be checked

0 = tile being excavated

* = the point furthest from the beginning

[space] = tile which is done (no more neighbors to check)

The animated gif above was created by using gOODiDEA’s NGif component – here you can see that I subscribe to the event MazeChanged and add a new Bitmap to the AnimatedGifEncoder for every new tile excavated in the maze:

//create mazes of sizes 11 through 22
for (int size = 10; size < 12; size ++ )
{

    //make a new mazecreator
    _creator = new MazeCreator(size, size, new Point(1, 1));

    //figure out a savepath with a logical name containing width and height
    string gifPath = string.Format("c:\\maze_{0:00}x{0:00}.gif", size);

    //output status to console
    Console.WriteLine("Creating " + gifPath);

    //subscribe to the mazechanged event
    //to get a fresh bitmap on every new tile excavated
    _creator.MazeChanged += new EventHandler<PointEventArgs>(CreatorMazeChanged);

    //create the animated GIF
    _gifEncoder = new AnimatedGifEncoder();
    _gifEncoder.SetDelay(100);  //in milliseconds
    _gifEncoder.SetRepeat(0);   //yes - repeat (-1 is NO)
    _gifEncoder.SetQuality(1); //for generating palette - 1 is best, but slowest
    _gifEncoder.Start(gifPath); //where to save the maze
    var maze = _creator.CreateMaze();   //create a maze
    _gifEncoder.Finish();               //end
                
    //show the animated gif    
    Process.Start(gifPath);
    Console.WriteLine("Furthest point: " + _creator.FurthestPoint);
}

Class diagram and code

Here you can download the project which displays how to use the MazeGenerator, and see the public members of the MazeCreator. If you only want random mazes and don’t care for anything else, just grab the zipped DLL.

image

 Code with sample project

 Just the DLL

 Just the MazeCreator.cs (right-click and choose “Save as…” to save)

More sample mazes  Smiley

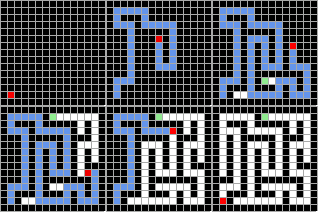
11 x 11 maze_11x11           13 x 13 maze_13x13          15 x 15 maze_15x15

image

musicForProgramming()

February 7th, 2012

Came across this website which has an interesting idea:

“What if we made music designed to occupy the part of your mind that distracts you from real work, thereby leaving you free to work more focused?”

That’s the simple concept behind musicForProgramming()

image

In their own words:

“Through years of trial and error - skipping around internet radio stations, playing our entire music collections on shuffle, or just hammering single albums on repeat, we have found that the most effective music to aid prolonged periods of intense concentration tends to have a mixture of the following qualities:

Drones
Noise
Fuzz
Field recordings
Vague memories (Hypnagogia)
Textures without rhythm
Minor complex chords
Early music (Baroque, lute, harpsichord)
Very few drums or vocals
Synth arpeggios
Awesome
Walls of reverb

Music possessing these qualities can often provide just the right amount of interest to occupy the parts of your brain that would otherwise be left free to wander and lead to distraction during your work.”

It’s dreamy, newagey-, easy listening and free Smile.

Note: of course, if you’re not a programmer – it can be used for a lot of other pastimes as well Winking smile.

Moving a WordPress blog – some tips…

January 31st, 2012

Moving dayI just moved the blog to a new webhost today. From Servage.net to UnoEuro.dk.
It took me quite a while to figure out the steps, as I haven’t worked with PHP/WordPress configuration files before. In case you want the bulletpoints, for moving your own blog, here they are:

You’ll need two things from the webhost you’re leaving:

- The complete contents of the FTP site (or minimum the wp-content folder)
- An export of the database (*.SQL)

Files
I took a copy of everything in the web-root of the host I was leaving, cleared the contents of the host I was moving to (after backing it up, just in case ;-)), and then uploaded everything to the new host.
Database
Servage had a webinterface where I could export the existing blog’s database as a *.SQL file, which I did.

After that I logged on to the phpMyAdmin website of UnoEuro and chose the SQL file for upload.

After that I figured that everything would be well – but alas I got the following message:

“Error establishing a database connection”

After Googling a bit I found out that the database settings are stored in the wp-config.php file. I figured out that since I had overwritten this with the Servage settings, the blog had a hard time connecting :).
So I deleted everything in the root folder of the FTP site again, and restored the backup I had, so the empty blog was in place. Then I deleted the wp-content folder, and uploaded mine. Among other things this folder has the plugins folder (where the syntax highlighter resides among others) and the themes folder where my custom theme is. So this folder is important for both the presentation and the functionality of the blog ;-).

Finding the right tables

After a bit of checking around in the config file, I noticed a variable called $table_prefix with the value drupalwp_.

/**
* WordPress Database Table prefix.
*
* You can have multiple installations in one database if you give each a unique
* prefix. Only numbers, letters, and underscores please!
*/
$table_prefix = 'aiwp_';

I had noticed in the phpMyAdmin that there were quite a few tables beginning with this name. Why the 'Drupal' I shall never know, but it got me worried that I had chosen some wrong settings when setting up the blog using the 1-click interface at UnoEuro ;-). Then I noticed that there were two sets of identical tables: one set prefixed with aiwp_ and one set prefixed with drupalwp_. Then it dawned on me: The old webhost had a prefix of aiwp_. And after configuring the $table_prefix value I suddenly had a site which worked !  … almost :).

Where’s the last half of each post?

To my great horror I noticed that a lot of my posts only contained the first sentence. The rest was missing. And also – the layout was skewed … a lot. After digging throught the aiwp_posts, where the blogposts are, and looking at the backup.sql file I could see that right where the sentences had been snipped – were some linebreak tags:  \r\n. After thinking for a while I figured out that the encoding of the SQL file may have had something to do with it. So after editing the SQL file in UltraEdit, and saving as UTF-8, deleting all tables in the database and importing the SQL file again – voilá. The blog was functional :).
Here is the SQL of my first blogpost, with the \r\n as you can see:

 INSERT INTO `aiwp_posts` VALUES (7,1,'2009-10-23 07:30:52','2009-10-23 06:30:52','Hi everybody. Well I finally took the dive into the binary fray of the Blog-O-sphere and here it is. A blog about my passion \"Gamedevelopment\".\r\n\r\nIn the times to come I will be creating a site with tutorials meant for beginners to get up-and-running, while posting API ideas,tools, etc. of my own creation.\r\n\r\nLooking very much forward to getting started, sharing and reading your feedback.\r\n\r\n- Jakob \"XnaFan\" Lund Krarup','Off to a running start... :)',0,' A blog about my passion \"Gamedevelopment\".','publish','open','open','','off-to-a-running-start','','','2009-10-23 07:30:52','2009-10-23 06:30:52','',0,'http://xnafan.net/?p=7',0,'post','',2);</p> 

Cleanup

I had a bit of cleanup, with some folders containing downloads. Since I am a unix newbie, I didn’t know that there is a difference in casing on *nix systems. So when I started using WordPress I had inadvertently  created a Downloads and a downloads folder which made it easy for me to make a mistake in uploading and linking to files. This was easy to fix, since all my blogposts were in the aiwp_posts table so I could use the REPLACE command in the phpMyAdmin to streamline.

UPDATE aiwp_posts
SET post_content = (REPLACE(post_content, ‘Downloads/’, ‘downloads/’));

After copying the files from Download into download,  I only have one download folder which is less frustrating ;-).

Hope some of you other WordPressers can use the info.

Android and Arduino combination kit – yay!

May 11th, 2011

Google has released news of the Android Open Accessory Kit which will enable users to interact with external sensors and outputs from an Android phone using a development board based on the Arduino Mega2560.  The kit will be priced around $400 but it will be possible to work with a much cheaper Arduino Host Shield and a standard Arduino.

It would be neat if a phone came out which had a row of programmable ports ready like the Arduino :). You could get instant texting support for turning on light/heat/etc. at home. Or the other way around - you would be able to have the phone monitor and report from any kind of sensor.

More at the Arduino website and the MakeZine website.