Archive for July, 2012

Rolling dice in XNA – complete code and sample

Wednesday, July 25th, 2012

I saw a post on the Microsoft XNA forums asking for hints on how to get a die rolling on the screen, so I’ve put together a little sample here, for your enjoyment Smile

This small “game” does nothing but roll six dice when you press SPACE, and sums them up for you. 
  Complete code here.

Short presentation of the program

As you can see above, there are six dice, instantiated to different positions in a diagonal line. The program listens for the SPACE bar being pushed. If all dice are stationary at that moment, then all the dice have their Roll() method invoked, which changes their state to Rolling and sets the MsLeftInRoll to 1000 (meaning a roll takes 1 second), and their Update method nudges their CurrentPosition property downward slowly for the full second. When all dice have stopped rolling, their ToString() implementation is used to display the result of the roll onscreen.

The Die class

The Die is a subclass of DrawableGameComponent, which makes Updating and Drawing easier. Just create a new Die object and add it to Game.Components. This will make sure that the Game objects’s Update and Draw calls Update and Draw on each die added.

for (int i = 0; i < 6; i++)
{
    //creates a new die, a bit further to the left and below the previous
    Die die = new Die(this, new Vector2(100 + 120 * i, 100 + 25 * i));

    //adds it to the Game's components, to make sure it gets updated and drawn
    Components.Add(die);
}

Here is the class diagram of the Die:
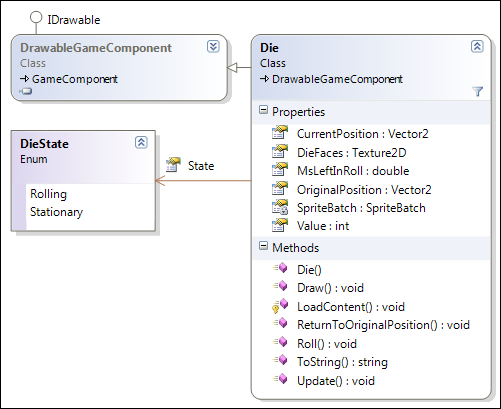
die_classdiagram

Creating a die

When the Die is created it is passed a reference to the Game object, and its OriginalPosition (where it begins every new roll).

Drawing the die

The die draws itself by finding the source-rectangle to draw from this PNG ( 100 x 600 pixels ) based on the current value of the die.

dice

Here's the math to find the current rectangle.

Rectangle sourceRect =
    new Rectangle(_dieFaceSize * (this.Value - 1) ,0, _dieFaceSize, _dieFaceSize);

_dieFaceSize is 100 pixels in this case, but is set dynamically based on the height of the Texture2D used.

When drawing the die's face, it is moved up and left by half of a _dieFaceSize (50 pixels in this case) so the texture is centered on the CurrentPosition of the Die. A shadow is created by first drawing the face with a semiopaque, black version of the face.

Rolling the die

Rolling the die is pretty straightforward:

//starts the die rolling
public void Roll()
{
    //if the die isn't already rolling
    if (this.State != DieState.Rolling)
    {
        //move it back to its starting position
        this.ReturnToOriginalPosition();

        //start it rolling
        this.State = DieState.Rolling;

        //reset the time to roll
        MsLeftInRoll = _msForRoll;
    }
}

Updating the die

For every Update, the time left in the MsLeftInRoll has the gameTime.ElapsedGameTime.TotalMiliseconds subtracted from it, and if it is below zero, the State of the Die changes to Stationary.

public override void Update(GameTime gameTime)
{
    base.Update(gameTime);

    //if the die is rolling
    if (this.State == DieState.Rolling)
    {
        //subtract the time since last Update from the rolltime
        MsLeftInRoll -= gameTime.ElapsedGameTime.TotalMilliseconds;

        //if time is up
        if (MsLeftInRoll <= 0)
        {
            //set the state to stationary
            this.State = DieState.Stationary;
        }
        else
        {
            //give the die a new value from 1 to 6
            this.Value = _rnd.Next(6) + 1;
            //move the offset a bit down along the Y axis
            this.CurrentPosition += Vector2.UnitY * 2;
        }
    }
} 

Hope this helps somebody when implementing their own diceroller Smile

Saving and loading data in a XNA windows game (XmlSerialization)

Monday, July 23rd, 2012

…with drag-and-drop code as a freebie Winking smile

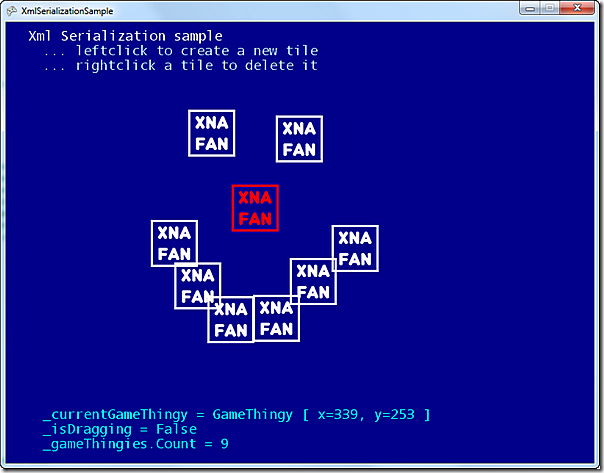
xmlserialization

Here is a short introduction to saving and loading your gamedata in XNA using the built-in .net xml serialization. This only works for Windows games, not XBOX nor Windows Phone 7. But if you (like me) mostly code windows games, it’s very easy to use Smile.

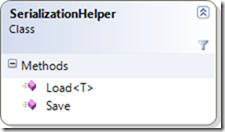
I’ve made a small helperclass “SerializationHelper” to assist with saving and loading data:

SerializationHelper

You use it by calling this code for saving objects:

SerializationHelper.Save(objectToSave); 

and this code for loading them again:

MyObjectType theObject = SerializationHelper.Load<MyObjecttype>();

Sample of loading in a game:

SpaceShip _ship = SerializationHelper.Load<Spaceship>();

See it in action

Here you can see how I move objects in an XNA game and then exit the game. When I restart the game, the objects are where I left them when I last shut down.

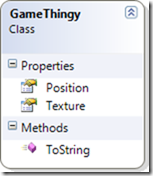
I made a small class called GameThingy to show how to serialize/deserialize.

GameThingy

Classes for Xml serialization must have a default (parameterless) constructor. This means that you cannot use subclasses of GameComponent (including DrawableGameComponent) without a bit of code-trickery. So this is mainly usable for your own, homerolled classes.

Also be aware that some objects (Texture2D for example) are not serialized out, so you need to add this data yourself after you’ve deserialized the objects from xml:

//load the texture to use for the GameThingies
Texture2D _xnafanTexture = Content.Load<Texture2D>("xnafan");
//load the list of GameThingy
List<gamethingy> _gameThingies = SerializationHelper.Load<List<GameThingy>>();
//if there wasn't a list of _gameThingies (file didn't exist)
if (_gameThingies == null)
{
    //create a new, empty list
    _gameThingies = new List<GameThingy>();
}
//set the Texture on all gamethingies
_gameThingies.ForEach(t => t.Texture = _xnafanTexture);

Here's a more thorough walkthrough of the code:


 Here’s the complete code.

Simple drag and drop with snap-to-tiles in XNA

Saturday, July 14th, 2012

If you need to create a tile-based editor, or for some other reason need to show selected tiles based on the mouseposition – here’s some code to help you do that Smile.

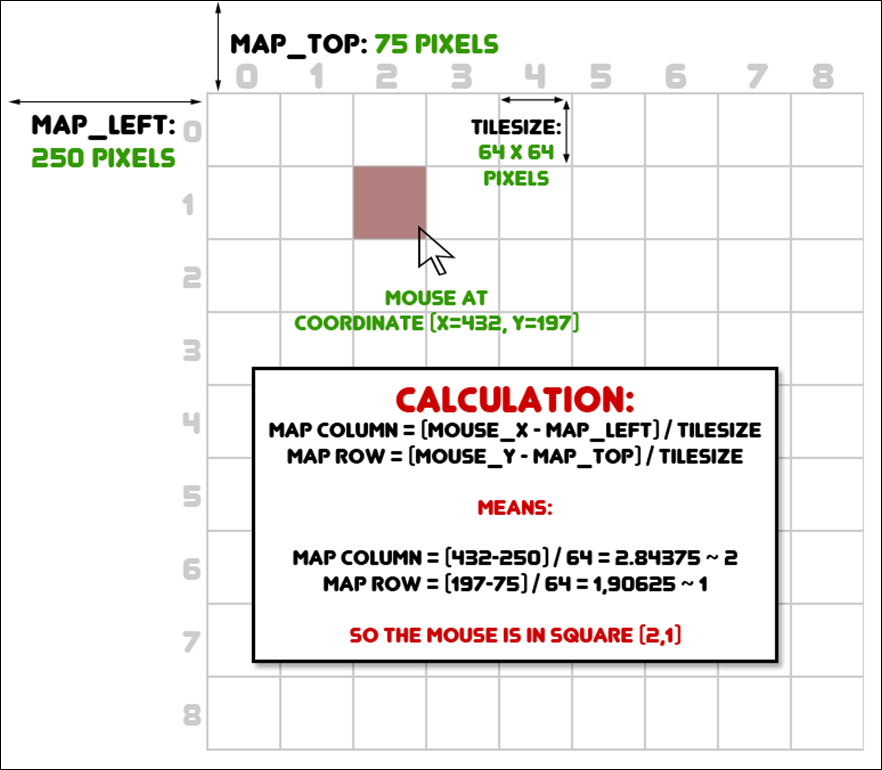
The most basic part of the code is figuring out what tile you are over by doing an integer division using the tile size. Let’s say your mouse is at (x=432,y=197) and each tile is 64x64 pixels. Which square is the mouse over?

well 432 / 64 = 6.75, but if this is done using two integers (int in C#), the decimal part is removed and we’re left with 6. The same with the y-part 197 / 64 = 3.078125 which is  3 without the decimal part.

Often however, you don’t want the map to start in the upper lefthand corner of the screen, so we need to subtract the position of the map from the coordinates.

This gives us something like this:

calculation

… where you subtract the top and left from the mouse’s coordinates before doing the integer division to find the square’s coordinates.

Here's the code above as a method which given the coordinates of the mouse, returns the row and column in the map:

//get the column/row on the board for a given coordinate
Vector2 GetSquareFromPosition(Vector2 position)
{
    //adjust for the boards offset (_boardPosition) and do an integerdivision
    return new Vector2(
    (int)(_mousePosition.X - _boardPosition.X) / _tileSize,
    (int)(_mousePosition.Y - _boardPosition.Y) / _tileSize);
}

Another noteworthy codesample

Making a “chessboard” out of the same Texture2D by alternating based on whether the column + row of a square is even or odd (by using the modulus “%” operator).

The modulus operator gives what is left after an integer division, so if you take an even number modulo 2 the remainder is zero, the remainder of an odd number modulo 2 is one.

float opacity = 1f;

//if we add the x and y value of the tile
//and it is even, we make it one third opaque
if ((x + y) % 2 == 0)
{
    opacity = .33f;
}
else
{
    //otherwise it is one tenth opaque
    opacity = .1f;
}

//draw the white square at the given position,
//offset by the x- and y-offset, in the opacity desired
spriteBatch.Draw(_whiteSquare, squareToDrawPosition, Color.White * opacity);

You can find the code here