XNA Arcade with dynamically loaded games
Sunday, October 7th, 2012This is a post inspired by a question asked at the XNA forums.
"I am planning to write an application for Windows with different modules. There should be a basic version and different addons which should extend this basic version. Imagine it as a collection of games. You'll have the basic pack with 5 games and should be able to extend it with more games.
Can this be realized with XNA?"
The answer is YES! ![]() ...let's code it!
...let's code it!

(If you'd rather download the code and figure it out on your own, the complete code is here)
What we are going to make
- a gamecenter which is the visual interface for loading and playing small games
- the functionality required to dynamically present all the games that come with the gamecenter
- functionality to load compatible games from DLLs in subfolders of the gamecenter
Before we begin
What we want here is to have something (a small game) behave differently depending on which game it is - but we should be able to load them all in the same way.
So our coder-mindset says: "Different things which should appear alike in code - AHA, WE NEED AN INTERFACE!!". Next our coder-mindset says "...but wait - we can probably implement some of the code in a superclass, to avoid having to code everthing again whenever we make a new game - AHA, WE CAN MAKE AN ABSTRACT SUPERCLASS!!! ![]() Basically, an abstract class is a class which you can't "new up" (instantiate) and it is often used to write code to reuse in subclasses.
Basically, an abstract class is a class which you can't "new up" (instantiate) and it is often used to write code to reuse in subclasses.
What we will need
The small games will need access to the GraphicsManager, a SpriteBatch, the ContentManager, and a reference to the Game class which is currently running, plus a couple of other things, for one thing a SpriteFont for ease of coding. The Update and Draw methods must be implemented differently in each game, so these methods are not coded in the abstract class (which is the reason it is abstract ![]() ).
).
Finally, we will add an Initialize method to store necessary variables. This Initialize method should then be called by the main Game when the minigame is ready to play.
The AbstractGame class
/// <summary>
/// This class is the basis for all the games that can be loaded in the main game
/// You have to implement Draw and Update like in a normal Game class.
/// Abstract means it isn't finished yet, and can't be "new'ed up"
/// </summary>
public abstract class AbstractGame
{
    //helperproperties, to store stuff you need to make a game
    public GraphicsDeviceManager GraphicsDeviceManager { get; protected set; }
    public GraphicsDevice Graphics { get; protected set; }
    public SpriteBatch SpriteBatch { get; protected set; }
    public ContentManager Content { get; protected set; }
    public Game Game { get; protected set; }
    public SpriteFont Font { get; protected set; }
    public bool GameOver { get; protected set; }

    //initializes a new game
    public void Initialize(Game game, GraphicsDeviceManager manager, SpriteBatch batch)
    {
        this.GraphicsDeviceManager = manager;
        this.Graphics = game.GraphicsDevice;
        this.SpriteBatch = batch;
        this.Content = game.Content;
        Font = Content.Load<SpriteFont>("DefaultFont");
    }

    //these methods must be implemented by your game
    public abstract void Draw(GameTime gameTime);
    public abstract void Update(GameTime gameTime);

}
Note - I've used the DisplayName attribute on the subclasses to be able to add a name to display for a minigame. I could have used a property, but then I would have to create a constructor on each minigame which set the variable. I thought this was cleaner ![]()
A concrete minigame implementation sample
[DisplayName("Tic-Tac-Toe, a classic for all ages")]
public class TicTacToeGame : AbstractGame
{
    public override void Draw(GameTime gameTime)
    {
        Graphics.Clear(Color.Yellow);
        SpriteBatch.Begin();
        SpriteBatch.DrawString(Font, "Tic-tac-toe - Q to quit", Vector2.One * 200, Color.Black);
        SpriteBatch.End();
    }

    public override void Update(GameTime gameTime)
    {
        GameOver = Keyboard.GetState().IsKeyDown(Keys.Q);
    }
}
In your Game class, make a variable of this type
AbstractGame _currentGame;
In your main game's Update and Draw methods you check whether the _currentGame variable is null. If it is you present a game selection screen where a user can select the possible games.
When a game is selected, you instantiate a concrete implementation (subclass) of the AbstractClass (Pong/Pacman/etc.), assign it the variables it needs and set the _currentGame to this.
//if game was selected (in this case Pong)
AbstractGame game = new PongGame();
game.Initialize(this, graphics, spriteBatch);
_currentGame = game;
In your main game's Update and Draw you call the Update and Draw of the game the player has chosen.
protected override void Update(GameTime gameTime)
{
    //if we're playing a specific game
    if (_currentGame != null)
    {
        //...call the update method of the game being played
        _currentGame.Update(gameTime);
    }
    else
    {
        //take input in gameselectionmenu
        //...

        //if game was selected (in this case Pong):
        AbstractGame game = new PongGame();
        game.Initialize(this, graphics, spriteBatch);
        _currentGame = game;
    }

    base.Update(gameTime);
}

protected override void Draw(GameTime gameTime)
{
    //if we're playing a specific game
    if (_currentGame != null)
    {
        //...call the update method of the game being played
        _currentGame.Draw(gameTime);
    }
    else
    {
        //draw gameselection menu
    }

    base.Draw(gameTime);
}
The GamesPackManager class
This class will inspect EXE files or DLL files (popularly named Assemblies in .net) and return a list of all the subclasses of AbstractGame in them.
In the sample code (download link at the bottom of this post) I've created a project "GamePackExtension" (Windows Game Library), with ChessGame and ShooterGame, both of which inherit from AbstractGame. The DLL from this project I have then copied manually to a subfolder in the main project's BIN/x86/DEBUG folder where it can be discovered by the GamesPackManager.
/// <summary>
/// This class makes it easier to load AbstractGame subclass types from DLLs
/// </summary>
public class GamesPackManager
{
    //Get all the AbstractGame subclasses from an assembly
    public List<Type> GetGames(Assembly assemblyToExplore)
    {
        return assemblyToExplore.GetExportedTypes().Where(aType => aType.IsSubclassOf(typeof(AbstractGame))).ToList();
    }

    //find the AbstractGame subclasses from DLLs in all the running game's subfolders
    public List<Type> GetGamesFromRunningGamesSubfolders()
    {
        //find out where the currently running game (the EXE) is located
        FileInfo gameExe = new FileInfo(Assembly.GetExecutingAssembly().Location);

        //get info about the containing folder
        DirectoryInfo executingGameDir = new DirectoryInfo( gameExe.DirectoryName);

        //find all *.DLL files in all subfolders of the game
        FileInfo[] dlls = executingGameDir.GetFiles("*.dll", SearchOption.AllDirectories);

        //make a list to hold all the games
        List<Type> listOfGameTypes = new List<Type>();

        //iterate through all DLL files and add the assemblies
        foreach (var item in dlls)
        {
            //load the assembly
            Assembly a = Assembly.LoadFrom(item.FullName);
            //get the games of the correct type
            listOfGameTypes.AddRange(GetGames(a));
        }

        return listOfGameTypes;
    }
}
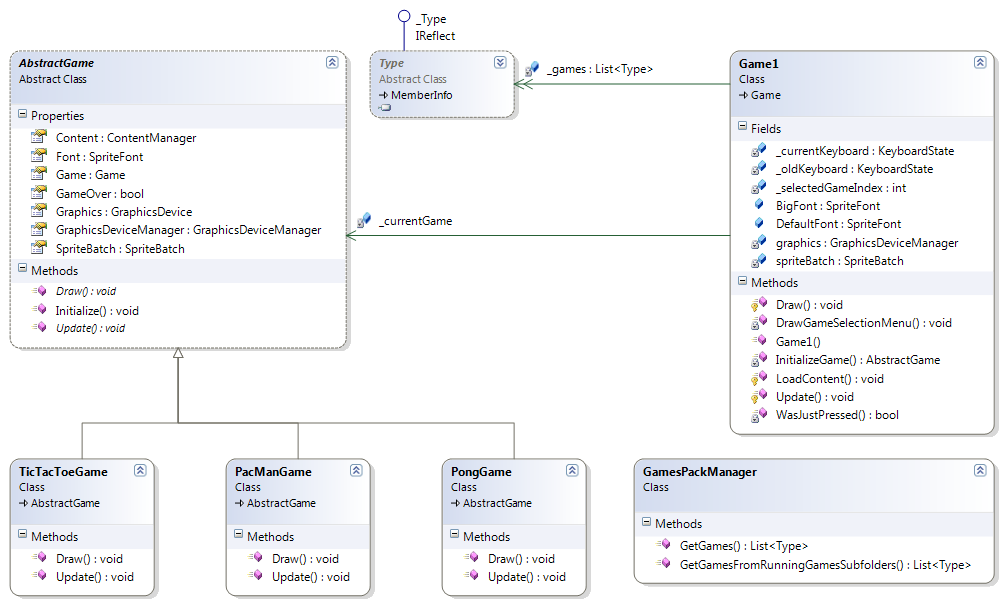
Class diagram
What else is in the code
- code to select a game by using the arrow and ENTER keys
- code to primitively highlight a menuitem by blinking, based on the time
Here's a small demo to show you what's going on in the democode.
I hope this is of use to you 
 Complete code


 13 x 13
  15 x 15


