2D terrain generation for XNA

January 5th, 2013

This is a small program for generating tilebased landscapes in XNA.

The logic behind the random world

Even though this program only saves maps as 2D, the generation has some 3D data in it.

The map is stored as a double array of bytes:

byte[,] _map = new byte[50,50];    //the map (stores height for each tile)

Each tile stores the height of the tile (a value between 0 and 255), and to begin with they are all zero.

To begin the creation of the world, about one fifth of the cells receive a random height between zero and 255. This simulates a young planet dotted with tall mountains. All tiles below the ocean level (which is 10 - see lower left corner of program) are colored blue.

image

This initial generation is done using this bit of code

//create the new map
byte[,] map = new byte[width, height];

int allCells = width * height;  //figure out how many dots to begin with
int amountOfFirstFillCells = (int)( allCells * percentageFillAtStart);

//add random heights to all the wanted cells
for (int i = 0; i < amountOfFirstFillCells; i++)
{
    Point p =  map.GetRandomCellPosition();
    map[p.X, p.Y] = (byte)_rnd.Next(255);
}

The byte[,].GetRandomCellPosition() is an extensionmethod I've created to help with the mapgeneration. You can get all the code at the end of this article.

Smoothing

As time passes (the user right-clicks), the mountains are worn down by smoothing them, so hills are created at their feet. This is done by calculating the average of the height of all neighbors for every tile and then elevating or lowering the tile accordingly. Here you can see the landscape from initial values over six iterations of smoothing:

mapmaker

The smoothing is performed with this bit of code:

//for calculating the average value of neighbors of a tile:
float tileSum = 0;              //the sum of the height of the neighbors
float numberOfNeighbors = 0;    //the number of neighbors for this tile

//to store the smoothed version of the map
byte[,] destinationMap = new byte[50,50];

//get the neigbors and go through them
foreach (var neighbor in sourceMap.GetNeighborContents(x, y))
{
    numberOfNeighbors++;                        //increase the number of neighbors found
    tileSum += neighbor;                        //and store the new sum of heights
}

//calculate the average of all neighbors
float averageForNeighbors = tileSum / numberOfNeighbors;

//find out what the difference between this tile and the neighbor average is
float difference = averageForNeighbors - sourceMap[x, y];

//introduce a little randomness
float randomPct = Math.Abs(difference * .1f ) * (_rnd.Next(6) -2);

//use a fifth of the difference to raise/lower + the randomness
destinationMap[x, y] = (byte) MathHelper.Clamp( (sourceMap[x, y] + difference * .2f + randomPct), 0, 255);

The most important thing to notice is that we are using a new doublearray for storing the values of the smoothed tiles as we go over the map. The reason for this is that if we updated the values of each tile in the original doublearray as we went along, then the neighbortiles would get an average calculated from the already smoothed tiles, and we would skew the distribution of smoothing. In the code I swap back and forth, calculating from one doublearray and putting into the other, and then vice versa.

Drawing

When drawing the map, all tiles that are higher than the current sealevel get a shade of green, the taller they are, the lighter it is.

The result

With CTRL+S the map is saved into a textfile for easy access from other platforms.

The width and height is stored at the top.

All the tiles that are higher than the current sealevel are stored as Xs and the rest as spaces.

mapmaker_notepad

Where to go from here?

This mapmaker only has the contours of the map. To populate the map with forests, swamps, deserts, etc. it would be pretty easy to make an algorithm that spreads these types of tiles out from random points on the map using flood fill algorithm. That would require that you store the different tiletypes, for example as integers.

Here's the code

The complete application (XNA 4.0, VS 2010).

Only the doublearray extensionmethods. (right-click > "save as...")

An extended version which can save heightmap and includes code for loading (but no support for it in the application)

"Small space shooter" – a Dogme 95 inspired game

January 5th, 2013

Director Lars von Trier and Thomas Vinterberg once created a set of rules called "Dogme 95" for making a specific type of movies.

One of the rules is:

"Filming must be done on location. Props and sets must not be brought in."

I regularly browse through the new art at www.OpenGameArt.org and I came across the work of Kenney (particularly his very elegant Space Shooter Art).

image

The thought struck me: "I'll make a Dogme Game where I'm only allowed to use this set of artwork and nothing else".

I have allowed myself the following slack:

  • I am allowed to use text
  • I am allowed to draw Kenneys graphics using another color in the SpriteBatch.Draw() call
  • I am allowed to scale the artwork

So far, I am very happy with the result. I am getting quite a bit of feedback from friends' kids on what needs to be added, so every once in a while I update the project.

What it looks like so far

image


How to play

Steer this

player

using the arrow keys,

while firing these

laserGreen

using the space key, to hit these

enemyShip

who are firing these

laserRed

towards you (avoid them, they're bad for you!)

You can also try to hit these

meteorBig

which break into these

meteorSmall

some of them even have powerups (shield/more guns).

As you progress through the levels, more enemies appear, shooting faster, eventually with targeting shots.

Try it - play or get code

You can play it with or without installing it (using click-once-deployment).
You can download the project here (xna 4.0, vs 2010), there aren't a lot of comments, but variable names are pretty descriptive Smiley

Shuffling lists in C# – an extensionmethod

January 4th, 2013

This is an extensionmethod for shuffling generic lists.

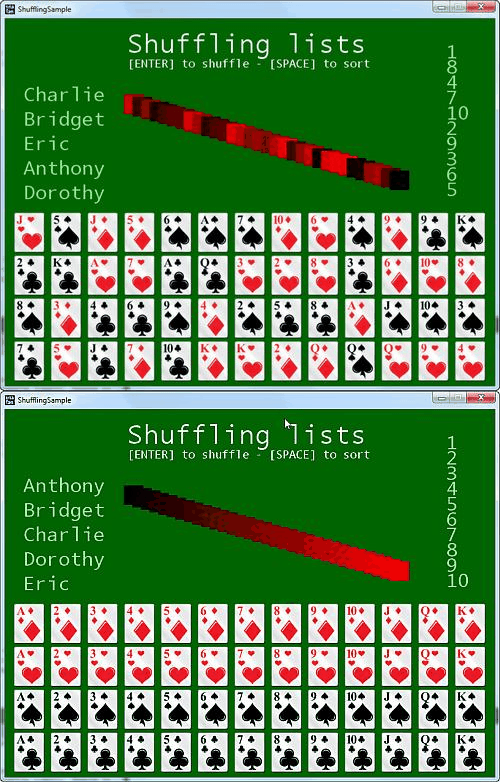
shuffling-anim

I absolutely LOVE generics!

Back in the days of .net 1.0 ("yaaawn" - I know, but bear with me...) there was a class called CollectionBase which had an ArrayList (like a "List<Object>") inside, and to make your own strongly typed collection you would inherit from CollectionBase and implement a typed Setter and Getter. No more of that - phew!!  Thank you Microsoft!!

The sample project  gives a demonstration of shuffling four different List types:

List<int> _numbers;
List<string> _names;
List<Color> _colors;
List<Card> _cards;

How to use it

When you've added a reference to the ListShufflerExtensionMethods class, all Lists get a Shuffle() method. So you can call Shuffle on any type of List.

_numbers.Shuffle();
_names.Shuffle();
_colors.Shuffle();
_cards.Shuffle();

The Shuffle() method has an optional parameter numberOfTimesToShuffle where you can specify how many times to shuffle. The default value is 5.

Demonstration

Complete code

Here you can see the implementation. Extensionmethods have to be public, static methods on a public static class. Using the "this" keyword on the first parameter passed to a method you effectively add the method to that type (see line 16 below).

/// <summary>
/// Class for shuffling lists
/// </summary>
/// <typeparam name="T">The type of list to shuffle</typeparam>
public static class ListShufflerExtensionMethods
{
    //for getting random values
    private static Random _rnd = new Random();

    /// <summary>
    /// Shuffles the contents of a list
    /// </summary>
    /// <typeparam name="T">The type of the list to sort</typeparam>
    /// <param name="listToShuffle">The list to shuffle</param>
    /// <param name="numberOfTimesToShuffle">How many times to shuffle the list
    /// by default this is 5 times</param>
    public static void Shuffle<T>(this List<T> listToShuffle, int numberOfTimesToShuffle = 5)
    {
        //make a new list of the wanted type
        List<T> newList = new List<T>();

        //for each time we want to shuffle
        for (int i = 0; i < numberOfTimesToShuffle; i++)
        {
            //while there are still items in our list
            while (listToShuffle.Count > 0)
            {
                //get a random number within the list
                int index = _rnd.Next(listToShuffle.Count);

                //add the item at that position to the new list
                newList.Add(listToShuffle[index]);

                //and remove it from the old list
                listToShuffle.RemoveAt(index);
            }

            //then copy all the items back in the old list again
            listToShuffle.AddRange(newList);

            //and clear the new list
            //to make ready for next shuffling
            newList.Clear();
        }
    }
}

Source code

Solution file as ZIP

ListShufflerExtensions.cs (right click > save as...)

ListShufflerExtensions.zip

Taking screenshots in XNA

January 4th, 2013

imageWouldn’t it be nice if it was simple to add screenshot functionality to your games? People who play your games could easily post pictures online, gathering even more interest in and publicity for your game? Smiley

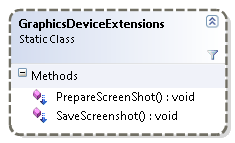
I’ve gathered some screenshot code I found on the web (credits in the code) in a little GraphicsDevice extension method. If you aren't familiar with extension methods, basically they add new functionality to existing classes - in this case adds two new methods to Microsoft's GraphicsDevice class.

class diagram

The class is here C# (right click > "save as..."), or ZIP.
Complete codesample here.

To use it :

  1. add the GraphicsDeviceExtensions class to your project
  2. call the GraphicsDevice.PrepareScreenshot() before the spriteBatch.Begin()
  3. call the GraphicsDevice.SaveScreenshot() after spriteBatch.End()

If you pass the SaveScreenshot method a filename or path then that filename will be used. If you don’t then screendumps will be saved in a file called Screenshot_001.png, Screenshot_002.png, etc. in the running game’s folder.

In the code sample below, the screenshot is prepared on line 9 and the screenshot is taken on line 34.

bool doScreenshot = false;  //set this to true to perform screenshot

protected override void Draw(GameTime gameTime)
{

    //if necessary, we prepare for a screenshot 
    if (doScreenshot)
    {
        GraphicsDevice.PrepareScreenShot();
    }

    //Clear graphicsdevice with blue background
    GraphicsDevice.Clear(Color.Orange);

    //begin drawing
    spriteBatch.Begin();

    //write test string
    spriteBatch.DrawString(_defaultFont, "Screenshot test!", new Vector2(100, 100), Color.Red);

    //write whether we are running in HiDef or Reach graphics profile
    spriteBatch.DrawString(_defaultFont, "Profile: " + graphics.GraphicsProfile,
        new Vector2(100, 200), Color.DarkRed);

    //call superclass' Draw()
    base.Draw(gameTime);

    //end drawing 
    spriteBatch.End();

    //if necessary, we save the image to a screenshot
    if (doScreenshot)
    {
        GraphicsDevice.SaveScreenshot();
        doScreenshot = false;
    }
}

Pointing and moving towards a target in XNA (2D)

December 28th, 2012

In this tutorial I will cover how to make something point and move towards a target. This is useful for homing missiles, steering zombies towards your player, pointing a car in the direction you're driving or a gun towards a target, etc, etc. (you get the idea Smiley).

What we will cover

  • What vectors are
  • How to get the direction from one point to another
  • How to move gradually towards a specific target
  • How to point a Texture2D in the correct direction
  • How to choose a rotation center for your images

What vectors are

Imagine you've found a treasure map looking something like this:
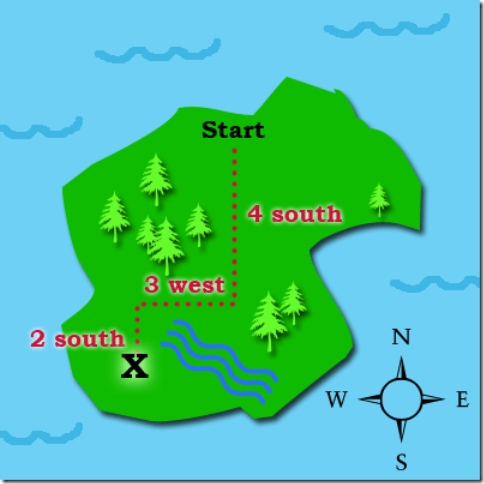
treasuremap

This map instructs you to "walk south 4 miles, west 3 miles, and south 2 miles again".

So the instructions consist of three parts, each with a direction and a distance.

In physics a vector is defined as  a direction and a force (think of our distance). So we're basically influencing our position using three vectors.

Those instructions above will lead you to the same end-point as the ones below:
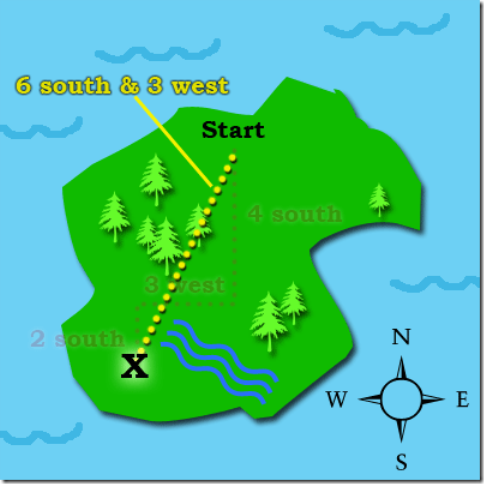
 treasuremap2

But here there is only one instruction: "go in a direction south-south-west, a direction which leads you 6 miles south and 3 miles west".

In XNA we have a class for storing movement in 2 dimensions: the Vector2 class. A Vector2 stores the movement horizontally (X) and vertically (Y), which also makes it useful for storing the position of something. When you are programming in 3D, you can use the Vector3, which gives you an extra dimension (the Z-axis).

But back to 2D... Smiley

In XNA  the top map's instructions would be written:

//create the three parts of the journey
Vector2 first = new Vector2 (0,4);
Vector2 second = new Vector (-3,0);
Vector2 third = new Vector (0,2);

//add them all up
Vector2 result = first + second + third;

//present the result 
Console.WriteLine(result); //writes "{X:-3 Y:6}"

Notice that the arithmethic operators "+", "-", "*", "/" all work on Vector2 - which is very nifty for calculating the resulting force on an object. For example if three forces: gravity, thrust from your rocket engines and meteor collisions all have to result in a believable combined effect on your trusty ol' spaceship Smiley.

How to get the direction from one point to another

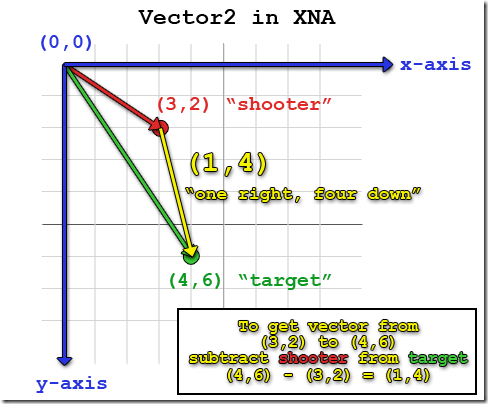
Let's look at a different example in XNA. In the illustration below we have two Vector2 objects (3,2) and (4,6). Notice that in this case we are using the Vector2 objects as positions, not movement. So feel free to visualize them as two points:

  • 3 pixels to the right and 2 pixels down from the top-left corner
  • 4 pixels to the right and 6 pixels down from the top-left corner
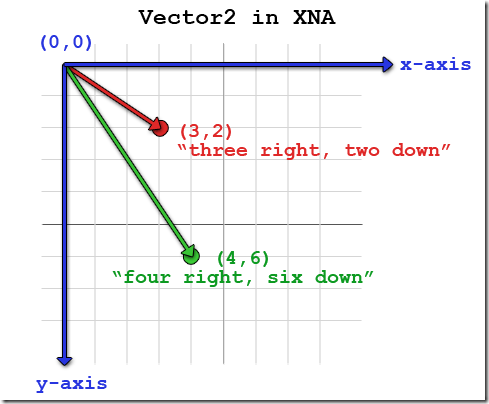
Targeting_in_xna

If you're wondering why (0,0) is at the top left corner, instead of the bottom left, that's just because that's the way it has been in programming since the dawn of computers Smiley.

Now we want to figure out what the direction is from the shooter to the target (for now as a vector, not radians).

When we want to calculate the direction (and distance) from one object to another we subtract the position of the targeting object from the position of the target. This gives us a vector which contains what we are missing in order to get to the target from the target. Later we'll look at how to turn this into degrees, in order to draw the targeting image correctly.
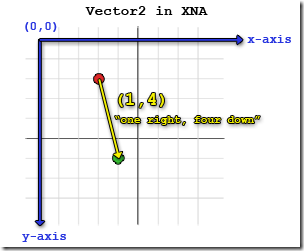
Targeting_in_xna2

In XNA this would be

//initialize the shooter and target
Vector2 shooter = new Vector2(3,2);
Vector2 target = new Vector2(4,6);

//get the difference from shooter to target
Vector2 differenceToTarget = target - shooter;

//present the result 
Console.WriteLine(result);  //writes "{X:1 Y:4}"

Helping you remember what to subtract from what

If (like me) you have difficulty remembering whether to subtract the shooter's position from the target's or vice-versa, do like me: think of a very simple example: shooter at (1,1), target at (2,2).

(This means the shooter should fire down and right (1,1))

Then find the correct method quickly by trial and error:

shooter minus target: (1,1) - (2,2) = (-1,-1) wrong! ...because (-1,-1) is up and left, away from the target

target minus shooter: (2,2) - (1,1) = (1,1) correct!

Another way to think about it is: when you subtract something from something else, the part you subtract becomes the new "zero", "reference point" or "world center". It becomes the part you compare to or look at other things in relation to.

Think of a grandchild (age 7) and her grandfather (age 67). subtracting the grandchild (7) from the grandfather (67) tells you how much older the grandfather is compared to the grandchild: 67 - 7 = 60.

subtracting the grandfather (67) from the grandchild (7) tells you how much younger the grandchild is compared to the grandfather: 7 - 67 = -60.

When you target something - you want the target's position IN RELATION TO (compared to) the shooter - therefore you subtract the shooter from the target (anyway - it makes sense to me Smiley, der blinker).


How to move gradually towards a specific target: getting direction without distance

We still need one more step before we can use the difference between current position and our destination for firing or movement. If we used the calculated difference as the movement for a bullet/car/stumpy dwarf/crusty orc in our Game's Update() method, the moved object would arrive at the destination at once.

In this code sample, imagine we have two Vector2s, storing the position of the player and an orc. We want the orc to chase our player. Here is how to NOT do it Smiley

public void Update(GameTime gameTime)
{
	
	//get the difference from orc to player
	Vector2 differenceToPlayer = playerPosition - orcPosition;
	
	//move the orc towards the player
	//NOT the way to do it - this will make the orc "teleport"
	orcPosition += differenceToPlayer;

}

The result is we set the orc's position to our player's position in an instant:

orc-teleport

(Original images by Krohn, www.OpenGameArt.org)

What we DO want to to do

What we want is to move gradually, so we want to move only part of the distance, but in the right direction.

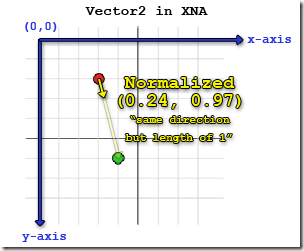
To get only the direction of a vector you normalize it, resulting in what is called a "unit vector" (a vector with a length of 1). This means that you have the relationship between the Y and X intact but if you use the vector for movement you only move 1 unit of whatever scale your world is in.

Here you can see our original vector and the normalized version
vector_normalized_01vector_normalized_02

Here is the code for normalizing a vector in XNA:

//get difference to target
Vector2 difference = target - shooter;

//normalize to only keep direction
difference.Normalize();

Moving at a certain speed

When you have the unit vector, you can go ahead and multiply your speed onto that vector. This will get you a vector with the length you need for a certain speed. Then you can add the resulting vector to what you want to move:

float orcSpeed = .2f;  //the orc's current speed

public void Update(GameTime gameTime)
{
	
	//get the difference from orc to player
	Vector2 differenceToPlayer = playerPosition - orcPosition;
	
	//** Move the orc towards the player **
	//first get direction only by normalizing the difference vector
	//getting only the direction, with a length of one
	differenceToPlayer.Normalize();

	//then move in that direction
	//based on how much time has passed
	orcPosition  += differenceToPlayer * (float)gameTime.ElapsedGameTime.TotalMilliseconds * orcSpeed;

}

This will make the orc gradually move towards our player - YAY! Smiley med åben mund

orc-move-gradual[4]

How to point a Texture2D in the correct direction

Now that we know how to get a unit vector pointing towards a specific target, we can use it to draw an image pointing towards that target.

To do that we

  1. calculate the direction in radian
  2. draw the image using one of the many overloaded SpriteBatch.Draw() methods, which include a rotation.

But before we can do that, we need to know how to convert a Vector2 to XNA radian.

How the XNA radians differ from the ones you have heard about in geometry

For some reason, in XNA they've chosen to go with a different system of angles than what you may remember from geometry.

In XNA zero degrees radian is UP - traditionally it is RIGHT.

In XNA you go CLOCKWISE as the angle gets greater - traditionally you go COUNTER-CLOCKWISE.
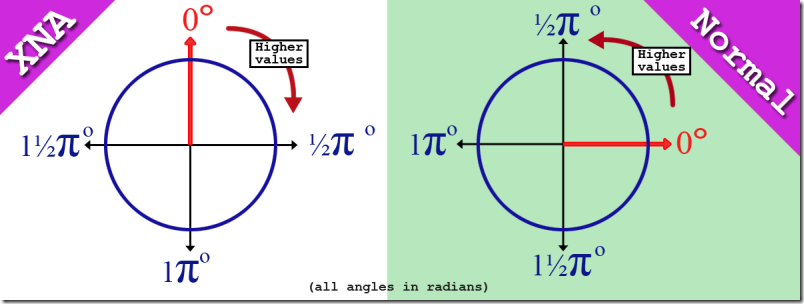
xnadegrees_800

What does this mean for you as a game programmer?

Stay in the traditional coordinate system for all calculation of rotation and movement for units, etc.

Then right before you draw the texture, convert the rotation to the XNA coordinate system Smiley.

So now you know that, here's the code:

How to convert a Vector2 to Xna radian, for drawing a texture

//converts a Vector2 to Radian for use in rotating an image
private float Vector2ToRadian(Vector2 direction)
{
    return (float)Math.Atan2(direction.X, -direction.Y);
}

How to convert euclidian radian to XNA radian for drawing a texture

//converts a euclidean angle in radian to XNA radian for use in rotating an image
private float EuclideanRadianToXnaRadian(float direction)
{
   return (float)Math.Atan2(Math.Cos(angle), (float)Math.Sin(angle));
}

To give you an example of how to use this in a game - I've made a little demo of steering an arrow towards the mouse cursor:

Sample project - steering towards the mouse cursor

Here is a small video showing the contents of the sample project.

Rotation and movement towards a Vector2

Below here is the core of the code from the sample. At the top of the code you can see the variables I need to store information about the arrow and the mouse. In the Update() method you can see how I calculate the rotation of the image using the Vector2ToRadian method above.

Vector2 _arrowDirection;        //direction from the arrow to the mousecursor
Vector2 _arrowposition;         //current position of the arrow
Vector2 _mousePosition;         //mouse's current position
float _arrowRotationInRadians;  //amount to rotate the arrow image to point at the mouse


protected override void Update(GameTime gameTime)
{
    _mouseState = Mouse.GetState();                                 //get the current mouse state

    _mousePosition = new Vector2(_mouseState.X, _mouseState.Y);     //get the target (the mouse cursor)
    _arrowDirection = (Vector2)_mousePosition - _arrowposition;     //get the direction from arrow to cursor

    //make the vector a length of 1 but keep direction
    _arrowDirection.Normalize();

    //for rotating the arrow texture correct (PNG with arrow pointing up)
    _arrowRotationInRadians = Vector2ToRadian(_arrowDirection);

    //if left mousebutton is clicked and the distance is larger than half of the arrow sprite's width:
    if (_mouseState.LeftButton == ButtonState.Pressed && Vector2.Distance(_mousePosition, _arrowposition) > 64)
    {
        //move the arrow sprite
        _arrowposition += _arrowDirection * (float)gameTime.ElapsedGameTime.TotalMilliseconds / 5;
    }

    base.Update(gameTime);
}

Drawing the image

For easy drawing, with the correct rotation in your game, it is necessary to have the image you want to use pointing upwards, as this is 0 degrees radian in XNA as you saw above in the chapter "How the XNA radians differ from the ones you have heard about in geometry".

So if you want a missile to chase someone, or a zombie to face somebody - find or create an image where it is facing up! Like this:
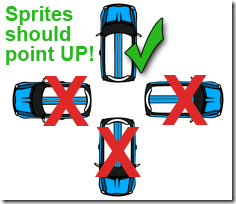
Sprite pointing up

Here is the Draw() method from the sample application.

protected override void Draw(GameTime gameTime)
{
    GraphicsDevice.Clear(Color.Navy);   //darkblue background
    spriteBatch.Begin();                //begin drawing

    //draw the arrow image (PNG 128x128 pixels) rotated around the center 
    spriteBatch.Draw(_arrow                     //the arrow texture
                    , _arrowposition            //it's location as a Vector2
                    , null                      //no source rectangle - use entire Texture2D
                    , Color.White               //with the image's own colors
                    , _arrowRotationInRadians   //at the current XNA radians
                    , Vector2.One * 64          //rotate the image around the center
                    , 1                         //use the original scale
                    , SpriteEffects.None        //don't flip or otherwise manipulate image
                    , 0                         //no changes to layer depth
                    );

    base.Draw(gameTime);    //call base class' Draw()
    DrawText();             //draw info
    spriteBatch.End();      //end drawing
}

The three important parameters to understand here are

  1. the _arrowposition - which is where we want the arrow to be drawn
  2. the _arrowRotationInRadians - which is the rotation (in XNA radians) of the image
  3. the Vector2.One * 64 - which is the same as a new Vector2(64, 64), which needs a little more explanation:

How to choose a rotation center for your images

When you use the SpriteBatch.Draw() method which allows you to rotate the Texture2D you're drawing, you also have to pass in the point you're rotating around. By default this is the top left corner of the image, which rarely gives you what you want.

Here you can see how rotation around different positions on a texture gives different results:
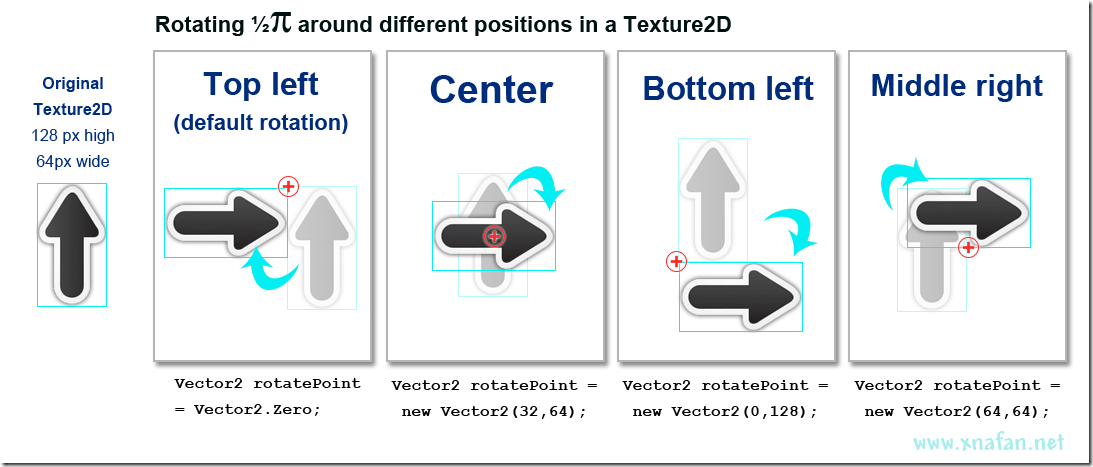
rotation

(click image for larger version)

So you can draw your images rotated around any position (even outside the Texture2D) - nifty! Smiley

The code

The complete chase mouse solution as ZIP (xna 4.0 vs2010)

I hope you enjoyed the tutorial, if you have ideas for improving it - please write me at "kr [at] rup [dot] dk"

XNA Arcade tutorial (3 of 5) – Creating the hosting game and selecting a game to play

October 24th, 2012

What we will cover

In this tutorial we will look at how to use the ArcadeGamesManager to inspect external DLLs for games, how to get information about them and how to instantiate a selected game and run it.

Information about what games are available (name and icon)

All games for the Xna Arcade are loaded from DLL files (Assemblies) from the game's folder or subfolders.

files

Here you can see the main (hosting) game "XnaArcadeTutorial.exe" which relies on the "ArcadeLibrary.dll" (with the ArcadeGamesManager class) for inspecting DLL files with games in them: "SampleGamesPack.dll".

For this tutorial all you need to know is that code in .net is hosted in Assemblies (often .exe or .dll files)which are self-contained units that have both code and a description of the contents. Sometimes the assemblies also contain further resources (text files/images/sound/etc..). For finding games in external assemblies, loading them and getting their icons, I've coded a helperclass, the ArcadeGamesManager.

The ArcadeGamesManager class

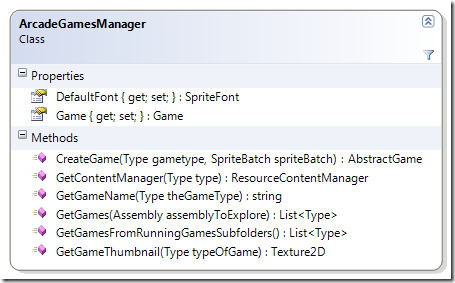
arcadegamesmanager

The ArcadeGamesManager assists in all the boring housekeeping and let's you concentrate on the fun stuff: Coding Games! Smiley. The short version is: the ArcadeGamesManager uses a method called Reflection to inspect an assembly (the dll file with games in) and find out which classes are subclasses of the AbstractGame class, information about these games are returned in a Type object. Type objects contain information about a given class/object and are used as parameters to the ArcadeGamesManager.CreateGame() when you want to instantiate a specific game for playing.

ArcadeGamesManager Codesamples

First code for instantiating a ArcadeGamesManager and using it to get a list of all the playable games:

//initialize a ArcadeGamesManager by sending it a reference to the HostingGame
ArcadeGamesManager _gamesManager = new ArcadeGamesManager(this);

//get all the games in all DLL files in the executing game's folder or its subfolders
List<Type> _games = _gamesManager.GetGamesFromRunningGamesSubfolders();

GetGameThumbnail and GetGameName assist in getting games' names and icons for making a menu for example:

//Iterate through all games and get name and icon
for (int i=0; i<_games.Count(); i++)
{
//get the icon for that gametype
Texture2D _gameIcon = _gamesManager.GetGameThumbnail(_games.ElementAt(i));
//read the DisplayName attribute from the class, to show its name
string gameName = _gamesManager.GetGameName(_games.ElementAt(i));
//do something with name and icon
//...
}

After selection of a game has been made and we want to start it, we use the CreateGame() method to create an instance (object) of that Type. How we write code to make a menu and select from the menu is covered in part 4 of this tutorial.

//get the typedescription of the type of game to start
Type typeOfGameToStart = _games.ElementAt(_selectedGameIndex);

//create an instance of a specific game, and store it in _currentGame
AbstractGame _currentGame = _gamesManager.CreateGame(typeOfGameToStart, spriteBatch);

What happens when the ArcadeGamesManager creates a new game

/// <summary>
/// Creates a new object of a game from the Type and initializes it
/// </summary>
/// <param name="gametype">The type of game to instantiate (must be subclass of AbstractGame)</param>
/// <param name="game">The hostgame which will run the abstractgame</param>
/// <param name="graphics">The GraphicsDeviceManager which this game can interact with</param>
/// <param name="spriteBatch">The SpriteBatch for the game to draw to</param>
/// <returns>The new instance of the game after it has been initialized</returns>
public AbstractGame CreateGame(Type gametype, SpriteBatch spriteBatch)
{
	//make sure the type describes a subclass of AbstractGame
	if (gametype.IsSubclassOf(typeof(AbstractGame)))
	{
		//call the constructor of the class
		AbstractGame _game = (AbstractGame)Activator.CreateInstance(gametype);
		//initialize it
		_game.Initialize(this,spriteBatch);
		//and return it
		return _game;
	}
	else
	{
		throw new Exception("The type " + gametype.Name + " is not a subclass of AbstractGame");
    }
}

As you can see the ArcadeGamesManager calls the Initialize method of the game it is creating and passes a reference to itself. Here you can see the AbstractGame.Initialize method and what is made ready for your game to take over and do its thing Smiley

public virtual void Initialize(ArcadeGamesManager gamesManager, SpriteBatch batch)
{
    //store references for use in this game
    GamesManager = gamesManager;
    Game = GamesManager.Game;
    GraphicsDeviceManager =
        (GraphicsDeviceManager) Game.Services.GetService(typeof(GraphicsDeviceManager));
    Graphics = Game.GraphicsDevice;
    SpriteBatch = batch;
    //store the contentmanager which points to the main game
    HostContent = Game.Content;
    //store the contentmanager which points to the game's own assembly
    LocalContent = GamesManager.GetContentManager(this.GetType());
    Font = GamesManager.DefaultFont;
}

XNA Arcade tutorial (2 of 5) – The AbstractGame and ArcadeGamesManager

October 18th, 2012

This is an introduction to how we will create the basis for all the games (AbstractGame)
which can be loaded and played in the XNA Arcade. We will also create a helperclass
(ArcadeGamesManager) which can load these classes and their resources from external
assemblies (DLLs).


2012-10-18_112144

Why an AbstractGame class?

At its core, what we want is to have something (a small game) behave differently depending on which game it is - but we should be able to load them all in the same way from the hostgame.
So our coder-mindset says: "Different things which should appear alike in code - AHA, WE NEED AN INTERFACE!!".
Next our coder-mindset says "...but wait - we can probably implement some of the code in a superclass, to avoid having to code everthing again whenever we make a new game - AHA, WE CAN MAKE AN ABSTRACT SUPERCLASS!!!Smiley med åben mund
Basically, an abstract class is a class which you can't "new up" (instantiate) and it is often used to write code to reuse in subclasses.

The basic structure - Draw() and Update()

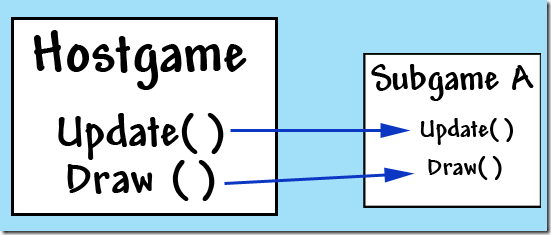
Since we are already familiar with the idea of the Game class in XNA, we will let the AbstractGame class have an Update and a Draw method as well. This simplifies running the subgame in the hostgame as the calls to Update and Draw in the hostgame will just forward the calls to Update and Draw in the whatever game is currently loaded.

updatedrawonsubgame

This effectively puts the hostgame out of the loop. So we need some way to return control when the subgame has ended. We do this by letting the hostgame read a public variable called GameOver on the subgame. The subgame can then set this variable to true when the hostgame should take control again. Here's code from the hostgame, calling the subgame's Update and Draw:

//To hold the currently running subgame
AbstractGame _currentGame;

protected override void Update(GameTime gameTime)
{
    //if we're playing a game
    if (_currentGame != null)
    {
        //if the game is over, empty the current game
        //thereby returning to the game selection screen
        if (_currentGame.GameOver)
        {
            _currentGame = null;
        }
        else
        {
            //call the update method of the game being played
            _currentGame.Update(gameTime);
        }
    }
}

protected override void Draw(GameTime gameTime)
{

    if (_currentGame != null)
    {
        //use that game's Draw
        _currentGame.Draw(gameTime);
    }
    else
    {
        //draw the hostgame's gameselection screen
    }
}

Give AbstractGame the tools it needs

Since the subgame isn't a real Game class it doesn't have access to the same variables that an ordinary Game does (e.g. ContentManager, GraphicsDevice, etc.). This means we have to supply it with these things. The way I've chosen to handle this is by making a helperclass (ArcadeGamesManager) which is instantiated using a reference to the hostgame. When you want an instance of a game you only need to tell the ArcadeGamesManager what type of game to create and give it a reference to the SpriteBatch you want it to draw on (here the "this" refers to the hostgame where the ArcadeGamesManager is created):

ArcadeGamesManager manager = new ArcadeGamesManager(this);

AbstractGame myGame = manager.CreateGame(typeof(MyChessGame), this.SpriteBatch);

What about resources?

Since we would like the subgames to be selfcontained - so just adding a new DLL to a subdirectory in the hostgame's folder will add new games - we need to be able to contain everything we need inside the DLL: code, graphics, sounds, fonts, etc. How we embed the resources will be covered in part 4, but just know for now, that the AbstractGame class has two ContentManager properties HostContent and LocalContent to be able to load content from both the hostgame and its own DLL.


contentload

The idea behind this is that you want the subgames to be able to stand on their own as well and supply all resources, but if you are developing a gamespack, you might design all subgames to load resources from the main game (fonts, textures, etc.) to give them a coherent look-and-feel.

This gives you both possibilities Smiley

Sample code

HostContent.Load("background"); //loads from the hostgame

LocalContent.Load("background"); //loads from the game's own DLL

Rolling your own subgame

Since you don't construct your own instances of your games, but leave that up to the ArcadeGamesManager, you may still want to do some intialization (load resources, set variables, etc.). The AbstractGame defines an Initialize method which you can override. Just make sure you call

base.Initialize(...)

as the first line in your own Initialize method, so the AbstractGame is initialized as well.

In my next (upcoming) blogpost I will look at how we inspect the DLL files and make it possible for the player to select a game to run:

Next chapter: Part 3 - Creating the hosting game and selecting a game to play

XNA Arcade tutorial (1 of 5) – loading games dynamically [Overview]

October 18th, 2012

This tutorial covers how to make an XNA game which can host other games.
It is a complete tutorial based on my previous blogpost. The code is expanded significantly in this tutorial series, and explained in more detail.  You need Xna 4.0 installed to run the demo.

2 minute introduction to the XNA Arcade

What we will cover

- creating an XNA game which can act as a host to others
- creating a tool to discover games in external assemblies (DLLs)
- embedding textures and sounds inside external assemblies, and extracting those resources
- making a scrollable menu with icons and the names of the discovered games (using RenderTarget)
- creating a subgame (Tic-Tac-Toe), by coding a concrete implementation of AbstractGame
- initializing subgames and passing control to them

IMPORTANT
The code presented here does not allow you to load other standard XNA games.
The games playable using this method are based on an AbstractGame class, where you implement Draw() and Update(). If you want to load a regular XNA game, you will have to move your code into a new class inheriting the AbstractGame class, and embed your resources in the DLL.


Links to the lessons

Part 0 -  The initial blogpost which got this ball rolling (a Betaversion of this tutorial Smiley)
Part 1 - This introduction to what the XNA Arcade is and what this tutorial-series covers
Part 2 - The AbstractGame class and the ArcadeGamesManager
Part 3 - Creating the hosting game and selecting a game to play
Part 4 - Creating a scrollable menu for gameselection using RenderTarget2D
Part 5 - Coding a  new subgame  and embedding XNA resources in the DLL

The code

Complete code (you may have to build the projects individually)


Just the playable version
(no source code)

Just the ArcadeLibrary.DLL you need for making your own games

XNA Arcade with dynamically loaded games

October 7th, 2012

This is a post inspired by a question asked at the XNA forums.

"I am planning to write an application for Windows with different modules. There should be a basic version and different addons which should extend this basic version. Imagine it as a collection of games. You'll have the basic pack with 5 games and should be able to extend it with more games.
Can this be realized with XNA?"

The answer is YES! Smiley  ...let's code it!

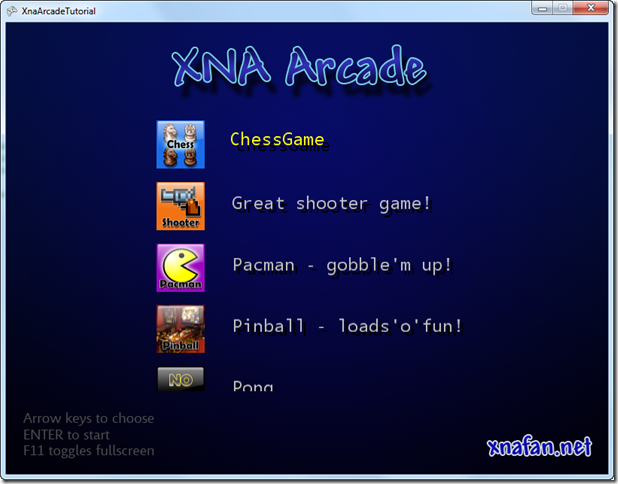
image

(If you'd rather download the code and figure it out on your own, the complete code is here)

What we are going to make

- a gamecenter which is the visual interface for loading and playing small games
- the functionality required to dynamically present all the games that come with the gamecenter
- functionality to load compatible games from DLLs in subfolders of the gamecenter

Before we begin

What we want here is to have something (a small game) behave differently depending on which game it is - but we should be able to load them all in the same way.
So our coder-mindset says: "Different things which should appear alike in code - AHA, WE NEED AN INTERFACE!!". Next our coder-mindset says "...but wait - we can probably implement some of the code in a superclass, to avoid having to code everthing again whenever we make a new game - AHA, WE CAN MAKE AN ABSTRACT SUPERCLASS!!! Smiley med åben mund Basically, an abstract class is a class which you can't "new up" (instantiate) and it is often used to write code to reuse in subclasses.

What we will need

The small games will need access to the GraphicsManager, a SpriteBatch, the ContentManager, and a reference to the Game class which is currently running, plus a couple of other things, for one thing a SpriteFont for ease of coding. The Update and Draw methods must be implemented differently in each game, so these methods are not coded in the abstract class (which is the reason it is abstract Smiley, der blinker).

Finally, we will add an Initialize method to store necessary variables. This Initialize method should then be called by the main Game when the minigame is ready to play.

The AbstractGame class

/// <summary>
/// This class is the basis for all the games that can be loaded in the main game
/// You have to implement Draw and Update like in a normal Game class.
/// Abstract means it isn't finished yet, and can't be "new'ed up"
/// </summary>
public abstract class AbstractGame  
{
    //helperproperties, to store stuff you need to make a game
    public GraphicsDeviceManager GraphicsDeviceManager { get; protected set; }
    public GraphicsDevice Graphics { get; protected set; }
    public SpriteBatch SpriteBatch { get; protected set; }
    public ContentManager Content { get; protected set; }
    public Game Game { get; protected set; }
    public SpriteFont Font { get; protected set; }
    public bool GameOver { get; protected set; }

    //initializes a new game
    public void Initialize(Game game, GraphicsDeviceManager manager, SpriteBatch batch)
    {
        this.GraphicsDeviceManager = manager;
        this.Graphics = game.GraphicsDevice;
        this.SpriteBatch = batch;
        this.Content = game.Content;
        Font = Content.Load<SpriteFont>("DefaultFont");
    }

    //these methods must be implemented by your game
    public abstract void Draw(GameTime gameTime);
    public abstract void Update(GameTime gameTime);

}

Note - I've used the DisplayName attribute on the subclasses to be able to add a name to display for a minigame. I could have used a property, but then I would have to create a constructor on each minigame which set the variable. I thought this was cleaner Smiley

A concrete minigame implementation sample

[DisplayName("Tic-Tac-Toe, a classic for all ages")]
public class TicTacToeGame : AbstractGame
{
    public override void Draw(GameTime gameTime)
    {
        Graphics.Clear(Color.Yellow);
        SpriteBatch.Begin();
        SpriteBatch.DrawString(Font, "Tic-tac-toe - Q to quit", Vector2.One * 200, Color.Black);
        SpriteBatch.End();
    }

    public override void Update(GameTime gameTime)
    {
        GameOver = Keyboard.GetState().IsKeyDown(Keys.Q);
    }
}

In your Game class, make a variable of this type

AbstractGame _currentGame;

In your main game's Update and Draw methods you check whether the _currentGame variable is null. If it is you present a game selection screen where a user can select the possible games.

When a game is selected, you instantiate a concrete implementation (subclass) of the AbstractClass (Pong/Pacman/etc.), assign it the variables it needs and set the _currentGame to this.

//if game was selected (in this case Pong)
AbstractGame game = new PongGame();
game.Initialize(this, graphics, spriteBatch);
_currentGame = game;

In your main game's Update and Draw you call the Update and Draw of the game the player has chosen.

protected override void Update(GameTime gameTime) 
{ 
    //if we're playing a specific game 
    if (_currentGame != null) 
    { 
        //...call the update method of the game being played 
        _currentGame.Update(gameTime); 
    } 
    else 
    { 
        //take input in gameselectionmenu 
        //... 
 
        //if game was selected (in this case Pong): 
        AbstractGame game = new PongGame(); 
        game.Initialize(this, graphics, spriteBatch); 
        _currentGame = game; 
    } 
 
    base.Update(gameTime); 
} 
 
protected override void Draw(GameTime gameTime) 
{ 
    //if we're playing a specific game 
    if (_currentGame != null) 
    { 
        //...call the update method of the game being played 
        _currentGame.Draw(gameTime); 
    } 
    else 
    { 
        //draw gameselection menu 
    } 
 
    base.Draw(gameTime); 
}

The GamesPackManager class

This class will inspect EXE files or DLL files (popularly named Assemblies in .net) and return a list of all the subclasses of AbstractGame in them.
In the sample code (download link at the bottom of this post) I've created a project "GamePackExtension" (Windows Game Library), with ChessGame and ShooterGame, both of which inherit from AbstractGame. The DLL from this project I have then copied manually to a subfolder in the main project's BIN/x86/DEBUG folder where it can be discovered by the GamesPackManager.

/// <summary>
/// This class makes it easier to load AbstractGame subclass types from DLLs 
/// </summary>
public class GamesPackManager
{
    //Get all the AbstractGame subclasses from an assembly
    public List<Type> GetGames(Assembly assemblyToExplore)
    {
        return assemblyToExplore.GetExportedTypes().Where(aType => aType.IsSubclassOf(typeof(AbstractGame))).ToList();
    }

    //find the AbstractGame subclasses from DLLs in all the running game's subfolders
    public List<Type> GetGamesFromRunningGamesSubfolders()
    {
        //find out where the currently running game (the EXE) is located
        FileInfo gameExe = new FileInfo(Assembly.GetExecutingAssembly().Location);
            
        //get info about the containing folder
        DirectoryInfo executingGameDir = new DirectoryInfo( gameExe.DirectoryName);
            
        //find all *.DLL files in all subfolders of the game
        FileInfo[] dlls = executingGameDir.GetFiles("*.dll", SearchOption.AllDirectories);
            
        //make a list to hold all the games
        List<Type> listOfGameTypes = new List<Type>();

        //iterate through all DLL files and add the assemblies
        foreach (var item in dlls)
        {
            //load the assembly
            Assembly a = Assembly.LoadFrom(item.FullName);
            //get the games of the correct type
            listOfGameTypes.AddRange(GetGames(a));
        }

        return listOfGameTypes;
    }
}

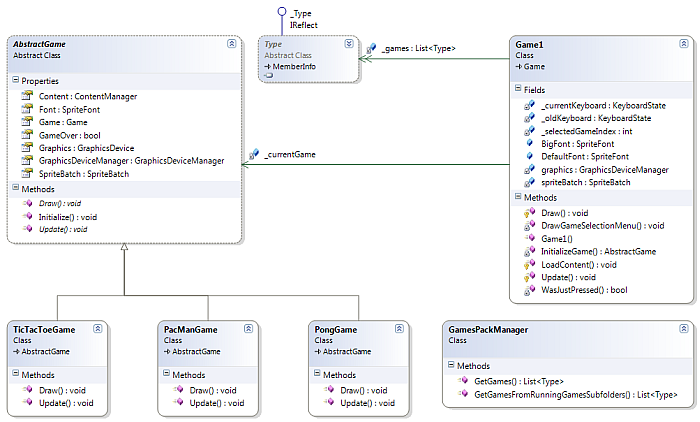
Class diagram

classdiagram

What else is in the code

- code to select a game by using the arrow and ENTER keys
- code to primitively highlight a menuitem by blinking, based on the time
Here's a small demo to show you what's going on in the democode.

I hope this is of use to you :)

download code Complete code

Rolling dice in XNA – complete code and sample

July 25th, 2012

I saw a post on the Microsoft XNA forums asking for hints on how to get a die rolling on the screen, so I’ve put together a little sample here, for your enjoyment Smile

This small “game” does nothing but roll six dice when you press SPACE, and sums them up for you. 
  Complete code here.

Short presentation of the program

As you can see above, there are six dice, instantiated to different positions in a diagonal line. The program listens for the SPACE bar being pushed. If all dice are stationary at that moment, then all the dice have their Roll() method invoked, which changes their state to Rolling and sets the MsLeftInRoll to 1000 (meaning a roll takes 1 second), and their Update method nudges their CurrentPosition property downward slowly for the full second. When all dice have stopped rolling, their ToString() implementation is used to display the result of the roll onscreen.

The Die class

The Die is a subclass of DrawableGameComponent, which makes Updating and Drawing easier. Just create a new Die object and add it to Game.Components. This will make sure that the Game objects’s Update and Draw calls Update and Draw on each die added.

for (int i = 0; i &amp;lt; 6; i++)
{
    //creates a new die, a bit further to the left and below the previous
    Die die = new Die(this, new Vector2(100 + 120 * i, 100 + 25 * i));

    //adds it to the Game's components, to make sure it gets updated and drawn
    Components.Add(die);
}

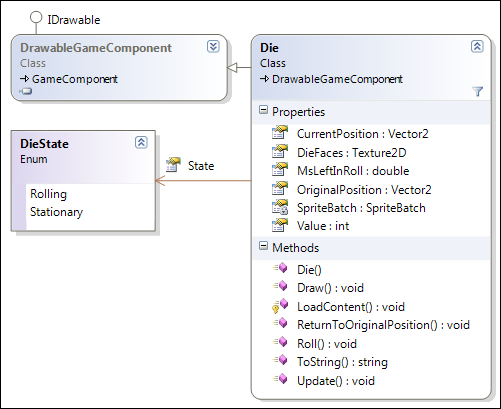
Here is the class diagram of the Die:

die_classdiagram

Creating a die

When the Die is created it is passed a reference to the Game object, and its OriginalPosition (where it begins every new roll).

Drawing the die

The die draws itself by finding the source-rectangle to draw from this PNG ( 100 x 600 pixels ) based on the current value of the die.

dice

Here's the math to find the current rectangle.

Rectangle sourceRect =
    new Rectangle(_dieFaceSize * (this.Value - 1) ,0, _dieFaceSize, _dieFaceSize);

_dieFaceSize is 100 pixels in this case, but is set dynamically based on the height of the Texture2D used.

When drawing the die's face, it is moved up and left by half of a _dieFaceSize (50 pixels in this case) so the texture is centered on the CurrentPosition of the Die. A shadow is created by first drawing the face with a semiopaque, black version of the face.

Rolling the die

Rolling the die is pretty straightforward:

//starts the die rolling
public void Roll()
{
    //if the die isn't already rolling
    if (this.State != DieState.Rolling)
    {
        //move it back to its starting position
        this.ReturnToOriginalPosition();

        //start it rolling
        this.State = DieState.Rolling;

        //reset the time to roll
        MsLeftInRoll = _msForRoll;
    }
}

Updating the die

For every Update, the time left in the MsLeftInRoll has the gameTime.ElapsedGameTime.TotalMiliseconds subtracted from it, and if it is below zero, the State of the Die changes to Stationary.

public override void Update(GameTime gameTime)
{
    base.Update(gameTime);

    //if the die is rolling
    if (this.State == DieState.Rolling)
    {
        //subtract the time since last Update from the rolltime
        MsLeftInRoll -= gameTime.ElapsedGameTime.TotalMilliseconds;

        //if time is up
        if (MsLeftInRoll &lt;= 0)
        {
            //set the state to stationary
            this.State = DieState.Stationary;
        }
        else
        {
            //give the die a new value from 1 to 6
            this.Value = _rnd.Next(6) + 1;
            //move the offset a bit down along the Y axis
            this.CurrentPosition += Vector2.UnitY * 2;
        }
    }
} 

Hope this helps somebody when implementing their own diceroller Smile